
Today, I’ll discuss how I planned this project and which measures I took to save money and time.
Frame
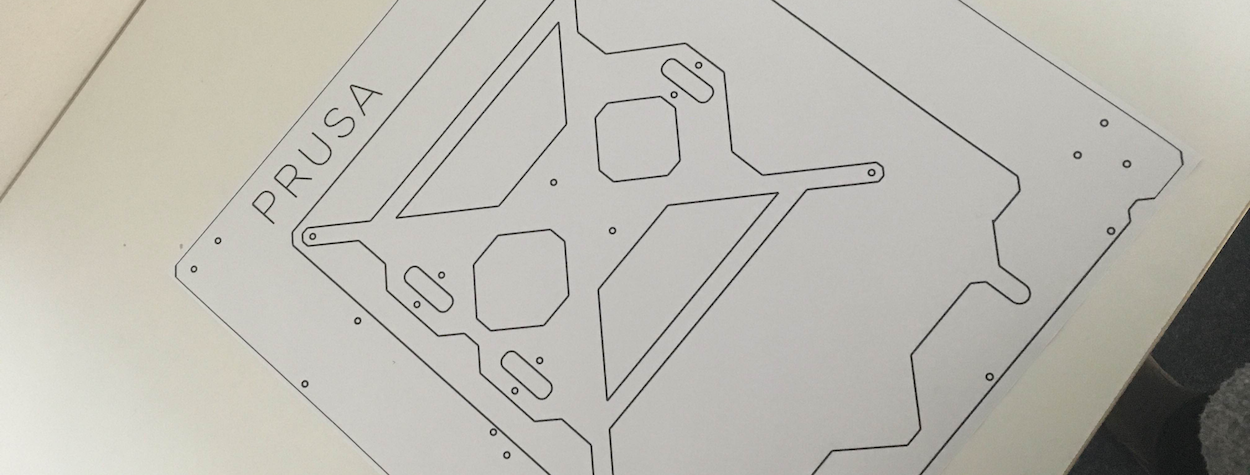
Starting with the main “plate”, there weren’t as many options as initially thought. I started to look for an aluminium one online and it turned out that they were either pretty expensive or quite off compared to the original, especially when looking for the taller, MK3 version which also has to have the new hole positions for the aluminium extrusions. Overall, i3 frames were more difficult to find than I had expected.
So I decided to approach this just like Thomas and Jules (see last post) and make it out of wood. If you want to print it on A4 paper, you’ll need 4 pieces, which might be a little tricky to align so I had the plans printed in one piece. After being either CNC milled or just cut with a jig saw, I will use the plans to drill the holes in the correct positions.
I found all of the files on the Prusa GitHub, but they were DXF-files. So if you want to CNC it, that’s perfect, but for printing on paper I converted them to PDFs which can be found here. It wasn’t trivial, as a lot of converters did not use the correct dimensions. These files should work!
 (I know, this is the MK2 blueprint but I didn’t have a photo of the new print ;-))
Extrusions
The aluminium extrusions on the back of the printer of course have to be shorter than the original ones to compensate for the thicker, wooden plate. This is why I’ll order them from a German shop once I have the plate done.
Purchased Parts
A lot of people who do cheap builds like to order from Aliexpress. But there were a few issues for me. On one hand, here in Germany not a lot of people use credit cards, which seems to be the only payment option over there; when trying to buy via PayPal there have always been issues and the orders were cancelled. On the other hand, delivery times are insane, like at least a month!
This is why I chose to order a lot from Banggood, which was always like a few € more, but delivery is maximum a month and PayPal works perfectly fine. This last year, I’ve bought a lot of stuff from them and there haven’t been any issues whatsoever. Delivery time is also the reason why I didn’t buy anything from Chinese eBay sellers.
The full BOM will be linked as soon as it is “final”, but basically the plan is to get all of the hardware (screws, profiles) and the “original parts” (Noctua Fan and Trinamics TMC2130 stepper drivers) from the hardware store and Amazon, while the electronics, heated bed, sensors, pulleys etc. are already ordered from Banggood.
Printed Parts
Most of the printed parts are just from the Prusa GitHub, except parts of the extruder / hotend assembly. The issue here is that the original i3 MK3 uses “Bondtech Gears” which are nowhere to be found as clones (please contact me if I’m wrong! :D), so I decided to print the Prusa MK2.3 hybrid extruder from Thingiverse, which uses a regular “MK8 Hobbed Gear” that is available on Banggood for ~1€ and I even had one at home. More details regarding the extruder will follow, as this model is intended for people who use a MK2 with endstops which we don’t.
In total, I managed to print almost all of the parts off a roll of dasfilament PETG (800g), which I had already used a bit in the past, so for a very rough estimate, I’d guess all of the plastic to be around 500-600 grams.